


In this post I want to show how to use a technical datasheet of a thermal printer (Star Tup900) and how to make it print out pictures (in black and white, of course).
Motivation
Maybe the first question that comes to mind is: why would you do that? The answer is simple. It was for a university project. I was given enough time and I had enough motivation to do it. We needed it to work as a part of a fotobox, that was built inside of an old info terminal. The terminal was given to the university by the city after they where too old to be reasonably maintanable. And there was the problem. On the one hand, they had a lot of awesome stuff built in, like a telephone, a touchscreen, webcam, a pc, speakers, coin changer and of course, a thermal printer. On the other hand, the chances were slim just to find a driver for any of these components.
The printer was that old, that the paper inside the printer was already yellow. So of course there was no driver for that. My next thought was to use an awesome library called python-escpos written in python. With that, you are able to communicate with the interface of the devices, and if needed, even send the raw Data to the printer. This is what we are going to use in the following segment, because the built-in commands of the escpos-library won’t work on this device.
How to communicate with the printer
This is how I followed the python-escpos documentation. You need to go there and install escpos first.
The escpos-libaray uses the command printer.Usb to communicate with USB-connected Printers. If the printer has a different port (for example, the Star Tup900 has a 25 pol. parallel port) you can use a adapter cable.
Then, you need to figure which address the printer has. For that, you should use a command line tool called
lsusb
If you type this in your terminal, the result should be similar to this:
Bus 020 Device 000: ID 1a2b:3c4d USB Printer Controller
...
The important part is 1a2b:3c4d. This is what we are going to use.
We will start our example with the following code:
from escpos import *
import time
import os

pathToThisFile = os.path.dirname(os.path.realpath(__file__))

from PIL import Image, ImageOps


p = printer.Usb(0x1a2b,0x3c4d)
The important part is now, to insert your address of the device, starting with a 0x.
And that is it! If you now add the Line
p.text("Test\n")
The printer should now print your text (on supported printers, this includes the Star Tup900).
How to use the technical documentation
The first step is to prepare the printer for printing a bit image. The necessary information is in the specification, but it is just way easier if I just tell you what they are and what they do:
p._raw(b'\x12') #Cancels upside down printing
p._raw(b'\x1B\x7A\x00') # line feed 3mm
The line feed is 3mm, so that there are no gaps after each line.
At this point, you may want to do more than this with your printer. So lets open the command specifications. You may be surprised at how much this document claims the printer can do. However, this file not only describes the capabilities of the Star Tup900, so a lot of stuff will not work.
The interesting portion is the section on page 52.
What you should find is the command
ESC K n1 n2 d1...dk
And a defined area of:
1 ≤ {(n1 + n2 x 256) x 3} ≤ printable region
k = (n1 + n2 x 256)
0 ≤ d ≤ 255
The k of the defined are does not mean the K of the command, but the k of dk.
By that, n1 and n2 defines the printable region. We want our printable region to be 255 bit wide. We can use a function from escpos to generate n1 and n2, and it is called _int_low_high(inp_number, out_bytes). Yes, this is private, but we will use it anyway, because it is just a quick tutorial. This function takes in a number, and distributes it to the given output bytes. It does that, by calculating the modulo of the number by 256. If you want cleaner code, you could re-implement this function.
At this point, it is helpful to open a Ascii Table, and look what bits we need to send. To simplify, we will send it as HEX-Codes.
Those are the bits we are going to send:
Character | Hex-Value
ESC       = 1B
K         = 4B
n1        = *
n2        = *
d1...dk

* = the _int_low_high function does that for us
d1…dk are our bits of the image. How are we going to send it?
In the document is a helpful image:
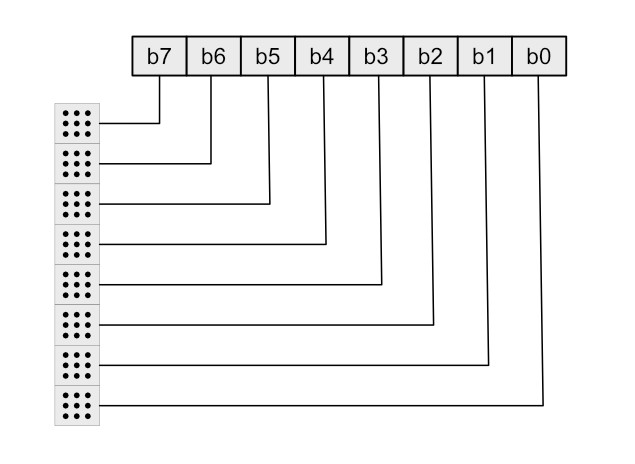
What they want to tell us is that they need the image bits in a column format. Escpos has a function built in to do that, called .to_column_format().
So we will use the following code to split the image:
lineheight = 8
blobs = im.split(lineheight)
for splice in blobs:
    spliceImg = escpos.EscposImage(splice)
    blobs = spliceImg.to_column_format()
    ...
So that is it, mostly. The other necessary code is documented as comments in the following example, and is mostly just for resizing the image.
Here is the complete example:
from escpos import *
import time
import os

pathToThisFile = os.path.dirname(os.path.realpath(__file__))

from PIL import Image, ImageOps # for resizing the image to the correct dimensions


p = printer.Usb(0x1a2b,0x3c4d) # USB cable or adapter

p._raw(b'\x12') # cancels upside down printing
p._raw(b'\x1B\x7A\x00') # line feed 3mm
p.text("\n") # make one line gap on top, so that the image does not start right away

img = Image.open(pathToThisFile + '/inputImageInSameFolder.png')

basewidth = 255

# the following code resizes the image to be workable
wpercent = (basewidth/float(img.size[0]))
hsize = int((float(img.size[1])*float(wpercent)))
img = img.resize((basewidth,hsize), Image.ANTIALIAS)

im = escpos.EscposImage(img)

lineheight = 8 # height of each printed line
header = b'\x1B\x4B' + p._int_low_high(im.width, 2) #header for each printed line
blobs = im.split(lineheight)
for splice in blobs: # split the image in lines
    spliceImg = escpos.EscposImage(splice)
    blobs = spliceImg.to_column_format()
    for row in blobs: # split lines in rows
        longrow = b''
        bitPosition = 0
        while bitPosition < len(row):
            intArray = [row[bitPosition]]
            bitString = bytes(intArray)
            longrow += bitString
            bitPosition +=3 #+3 because the image is rgb
            # you could also convert the image to greyscale first,
            # but for this demo this code it works well enough
        p._raw(header + longrow)
        time.sleep(0.1) #because otherwise the printer will freeze
        p._raw(b'\x0A') #new line, character LF (line feed)
        time.sleep(0.1)

p.text("\n") # new line for space after the image. You may need more of these, if your image is cut up
p._raw(b'\x1b\x64\x00') # cut the paper
And that is it! Thanks for reading and good luck working with your printer. The Star Tup900 also supports a mode with a printing resolution 3x this high, however, the setup is really weird and took a long time to print. So this would be a blog post for another day.